
Helpful tips and examples for creating advanced calculation fields
For an introduction to advanced calculations, refer to the Creating Advanced Calculations help article. This article expands on that article with some helpful tips and useful examples.
Helpful Tips
-
Syntax - If a calculation isn't saving, make sure you are using the appropriate syntax. A common pitfall is not having the exact number of parentheses at the end of a long formula or not having enough commas throughout the formula. One helpful way to test the syntax is to write or test the formula in a spreadsheet prior to writing the formula in the application.
-
Hidden Calculations - It is often helpful to break long formulas into multiple calculations. However, you may only wish to display the final calculation. You can create “Hidden” Fields by creating a Field and not displaying the Field anywhere into the form. You can then use this Field as a Field input in additional calculated fields. We walk through an example of using this approach in Example 1 below.
-
Labels - When applying labels to a calculation, sometimes you may wish to apply a label that falls outside the general rule for the label. A successful approach to solve this problem is to build in outcomes for the “exceptions” into an if-statement. We walk through an example of using this approach in Example 2 below.
Example 1 - Using a hidden calculation to break down a long formula.
Use Case: A user wants to assign a Third Party Risk Tier driven by the answer to the following five questions:
|
Q1 |
Will the third party store or have access to confidential data? |
Yes (1), No (0) |
|||
|
Q2 |
Does the organization lack a set of information security policies? |
Yes (1), No (0) |
|||
|
Q3 |
Does the organization lack restriction and control of privileged access rights? |
Yes (1), No (0) |
|||
|
Q4 |
Will the organization have physical access to the company? |
Yes (1), No (0) |
|||
|
Q5 |
How many employees does the Third Party currently have? |
1-100 (0), 101-500 (0), 501-2,000 (1), >2000 (1) |
|||
The rules for calculating a tier are as follows:
|
Q1 = yes AND Q5 = 1-100 OR 101-500 |
Tier 1 |
|
Q1 = yes AND Q5 = 501-2,000 OR >2,000 |
Tier 2 |
|
Q1 = no AND Q2-Q4 = Yes |
Tier 3 |
|
Q1 - Q4 = no |
Tier 4 |
Step 1: Setup select fields for each question and assign values to the select options for each question.
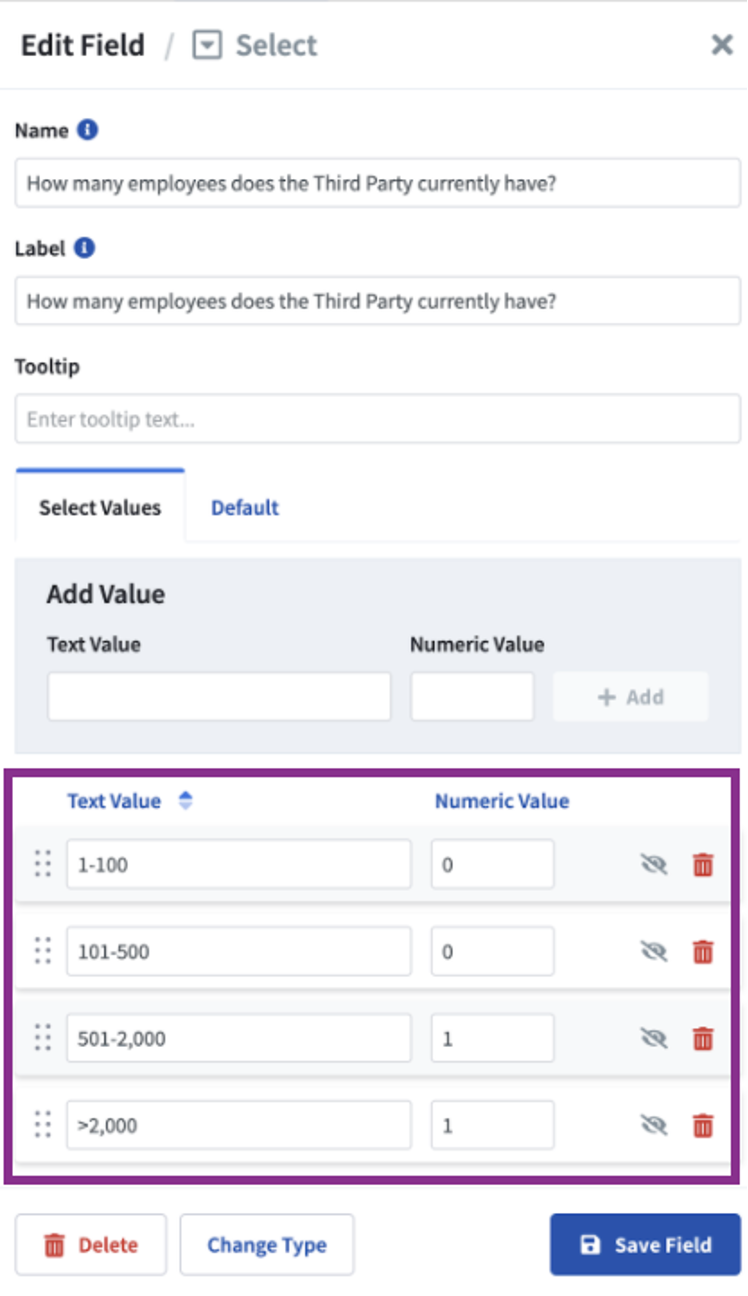
In this example, we have assigned the value of ‘1’ for each ‘yes’ option and the value of ‘0’ for each ‘no’ option for questions 1-4 (see Figure A for an example). Since 1-100 and 101-500 employees are treated the same in this example, we have assigned the value of ‘0’ for each of these select options for question 5. Similarly, we have assigned the value of ‘1’ for the remaining select options in question 5 (see Figure B).
Figure A
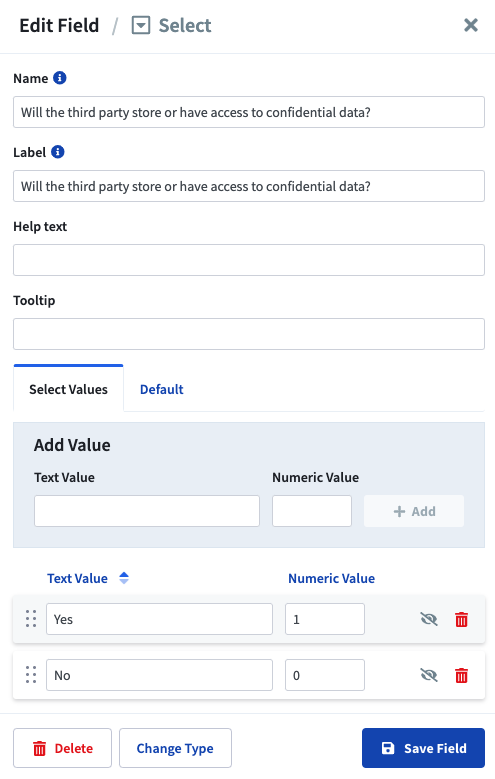
Figure B
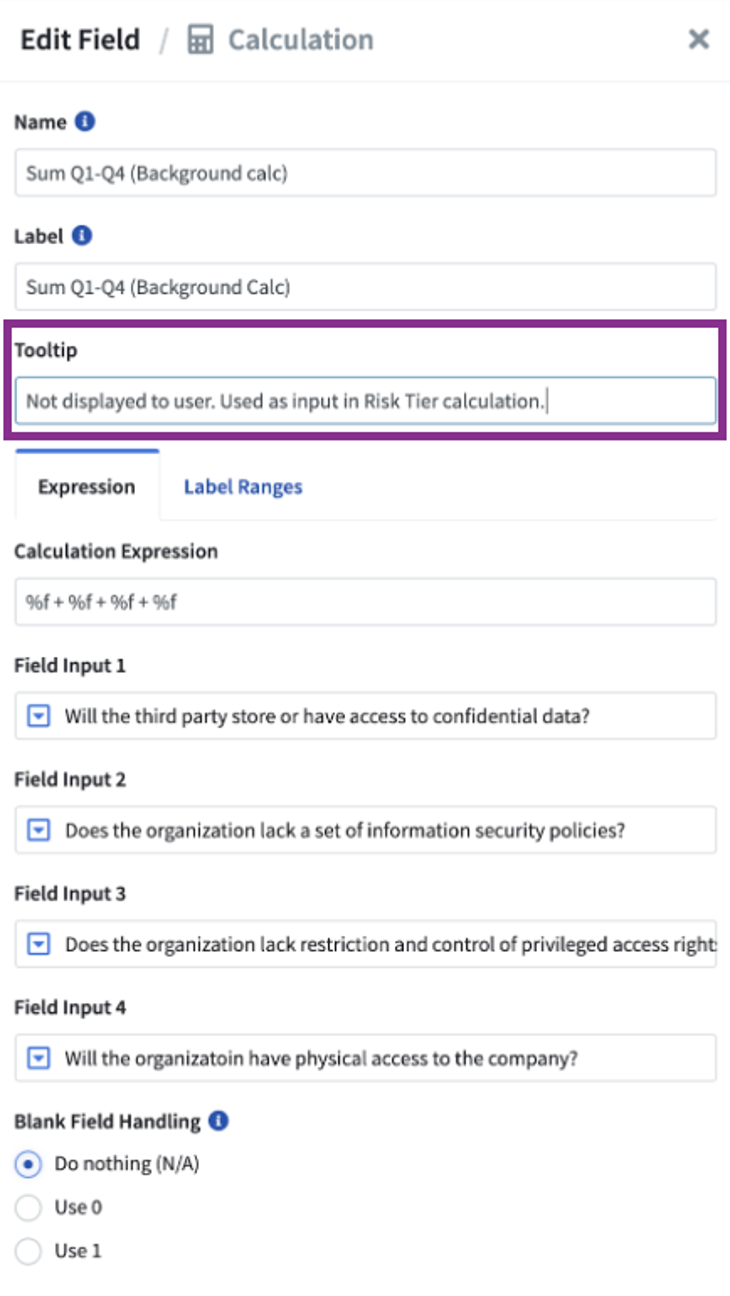
Step 2: Create a hidden calculation for both the sum of questions 1-4 and the sum of questions 2-4.
Since the sum of questions 1-4 and the sum of questions 2-4 can drive some of the outcomes, creating separate calculations for the sum of these questions makes sense in this scenario. We will then use these calculations as input fields in the final risk score calculation. Breaking down into multiple calculations makes the formula more manageable. To create a hidden field, create a new calculation field but do not drag it into the form (see Figure C for an example).
Figure C
Step 3: Create a calculated field to determine the risk tier.
Now that we have broken down the formula and created hidden calculations we can create a calculated field to determine the risk tier. To do so we will use a nested if-statement where each outcome has its own if-statement. The end result is the following if-statement, with 7 field inputs (see Figure D for the field inputs):
if(%f==0, 4, if(%f==1 && %f==0, 1, if(%f==1 && %f==1, 2, if(%f==0 && %f==3, 3, 4))))
Remember to ensure the appropriate number of parentheses, commas, ‘&’ symbols and ‘==’ symbols are used.
Figure D

Step 4: Assign a tier label.
Finally, we can now assign a tier label based on the formula created in the previous step. In this example if the calculated value is 1, the record should be labeled Tier 1, if the calculated value is 2, the record should be labeled Tier 2, etc... (see Figure E).
Figure E
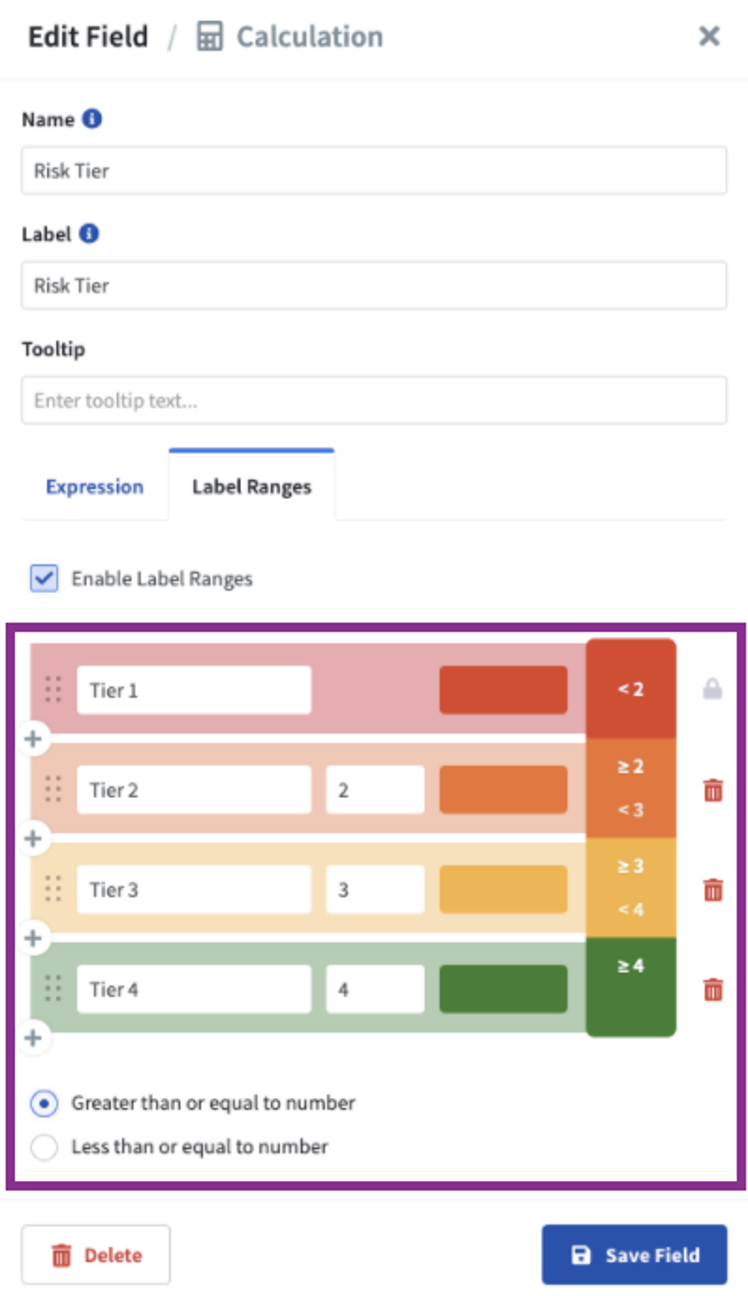
The end result is a calculated field that automatically assigns a Risk Tier based on the combination of the answers to questions 1 through 5!
Example 2 - Applying labels with exceptions to the general label rule
Within the Risk Cloud Platform you have the ability to assign labels to a calculated Field based on the calculated value (as seen in Example 1). Oftentimes the label criteria falls within a straight-forward range, but other times, there may be exceptions where records should be assigned a different label than the general rule.
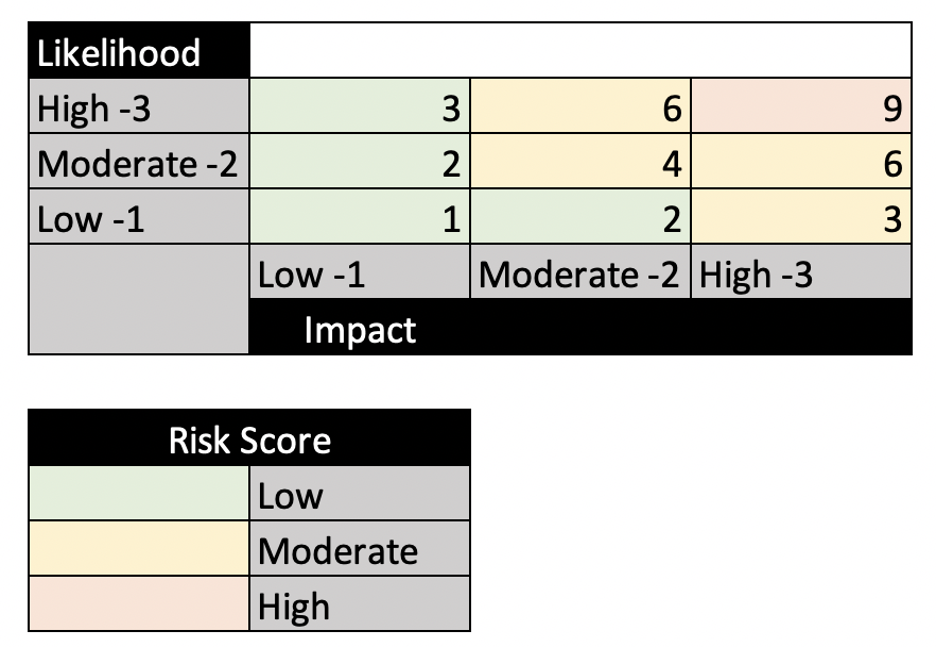
Use Case: Automatically assign a risk rating based on the below matrix:
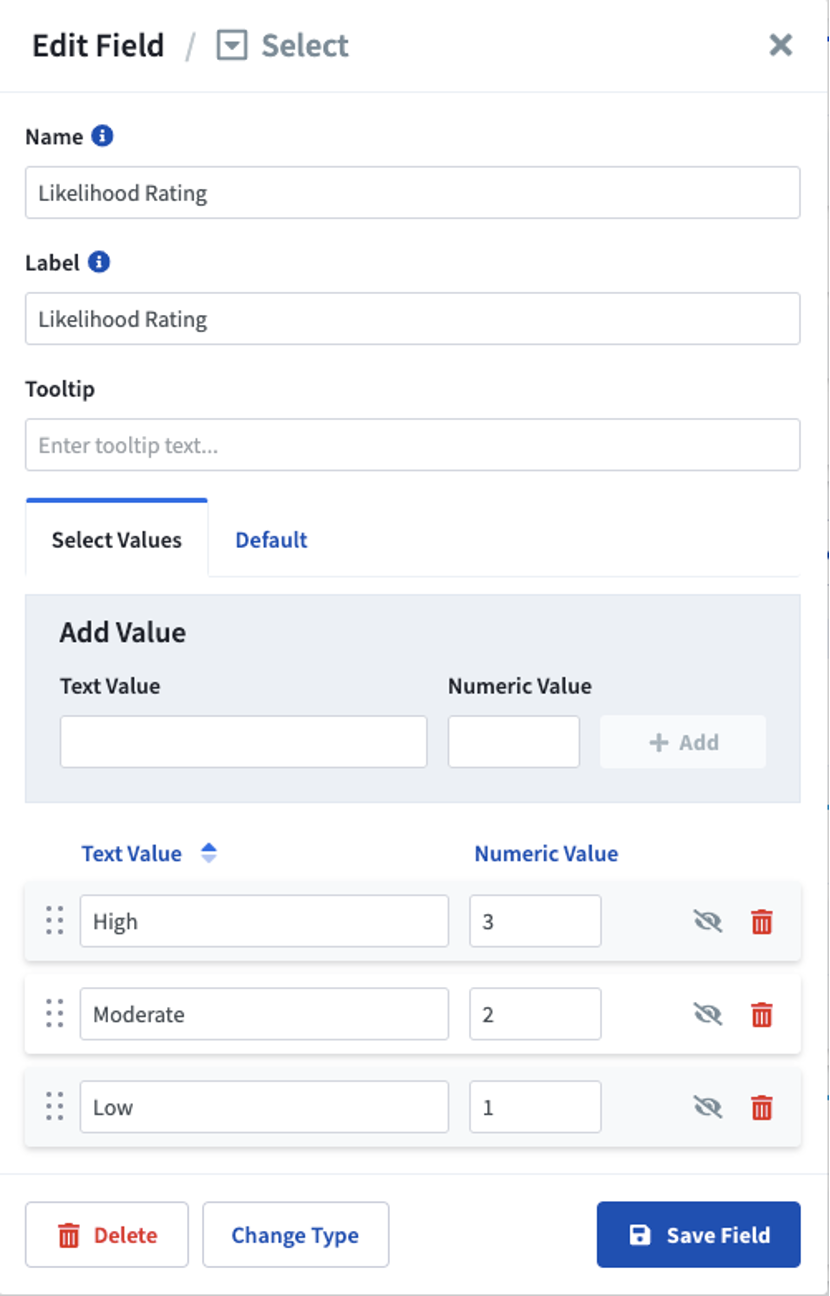
Step 1: Create select fields for ‘Likelihood’ and ‘Impact’ and assign values for each option.

Step 2: Identify ‘Exceptions’ to the standard rules.
As a general rule, risks should be assigned as follows in this example:
- 1-3 = ‘Low’
- 4-6 = ‘Moderate’
- 7-9 = ‘High’
However, based on the matrix above, there are scenarios where a calculated score should be assigned differently than the general rule. For example, a record with a Likelihood of ‘Low’ (1) and Impact of ‘High’ (3) is scored a value of 3. According to the general rule, a score of 3 would be labeled a ‘Low’ risk, but per the risk matrix, a record with a Likelihood of ‘Low’ and Impact of ‘High’ should be considered a ‘Moderate’ risk.
Step 3: Create a calculated Field to drive the risk label.
If the general rule applied to any record, we could simply set up a calculated Field that multiplies the Impact times Likelihood. However, since there are exceptions to the general rule, we need to use an if-statement.
The label ranges should be setup according to the general rule:
In the calculation expression, we will need an if-statement for the ‘Exception’ to re-assign the ‘Exception’ to a value that falls within the general rule. Going back to our example of a Low-High Record that would normally be assigned a value of 3, the if-statement is as follows: "if(%f==1 && %f==3, 4)." What this statement is saying is, “if a Record has a Likelihood of 'Low' and Impact of 'High', assign a value 4” By assigning a value of 4, we are ensuring the Record will be labeled as a 'Moderate' risk rather than a 'Low' risk.
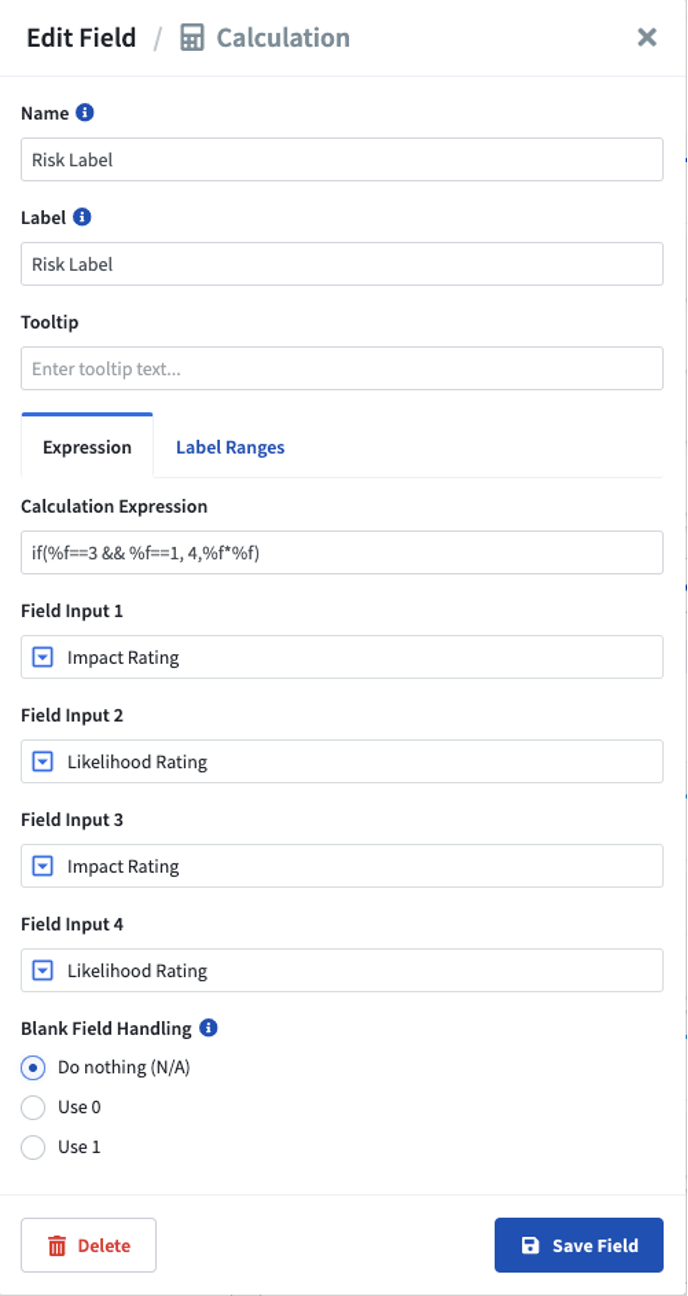
Once all exceptions are accounted for in the nested if-statement, we will close the statement with “, %f*%f)”, where the field inputs are Impact Rating and Likelihood Rating. By doing so, if one of the exceptions is not met, the general rule of Impact multiplied by Likelihood will apply. The end result is the following if-statement:
if(%f==1 && %f==3,4,%f*%f)
The end result is a calculated field that automatically assigns a Risk label based on the defined matrix! Note if the true calculated numeric risk value is still important you can create an additional calculated field that multiplies the Impact by the Likelihood.