
Overview
This guide provides an overview of how to use the Scoped Assessments tool to streamline your assessment scoping process and automate key aspects for increased efficiency. Designed for use cases like Risk Control Self-Assessments (RCSA), this feature also applies to other scenarios where audits or assessments need to be initiated based on a specific scope, such as organizational entities or GRC entities.
For example, you can utilize this tool to conduct RCSAs for your Business Units or Legal Entities. The Scoped Assessments tool automatically leverages relationships between your GRC entities (e.g., Processes, Risks, Controls) and organizational entities (e.g., Business Units, Legal Entities), making it easier to define and assess the appropriate scope.
This video also highlights the core functionality of Assessment Scoping.
Builder-Side
Scoped Assessments Setup Overview
- A Builder must first enable Assessment Scoping for their desired workflow, which can be found in the Workflow Settings. Then they must add an Assessment Scoping Subsection within the relevant Workflow step.
- Ex. In an RCSA workflow, you may set up an Assessment Scoping Subsection so your Program Owners can scope and launch their assessments.
- An end user can then kick off the scoping exercise to launch their assessments on that section of a Record.
Enabling Scoped Assessments
To begin using the Scoped Assessments feature:
- Navigate to the Workflow Settings of the desired workflow.
- Open the Advanced Settings tab and check the box to Enable Assessment Scoping.
Once enabled, builders can add Assessment Scoping Subsections to relevant workflow steps.
Creating the Scoping Subsections
Adding the Scoping Subsection
- Select the workflow step where scoping is required.
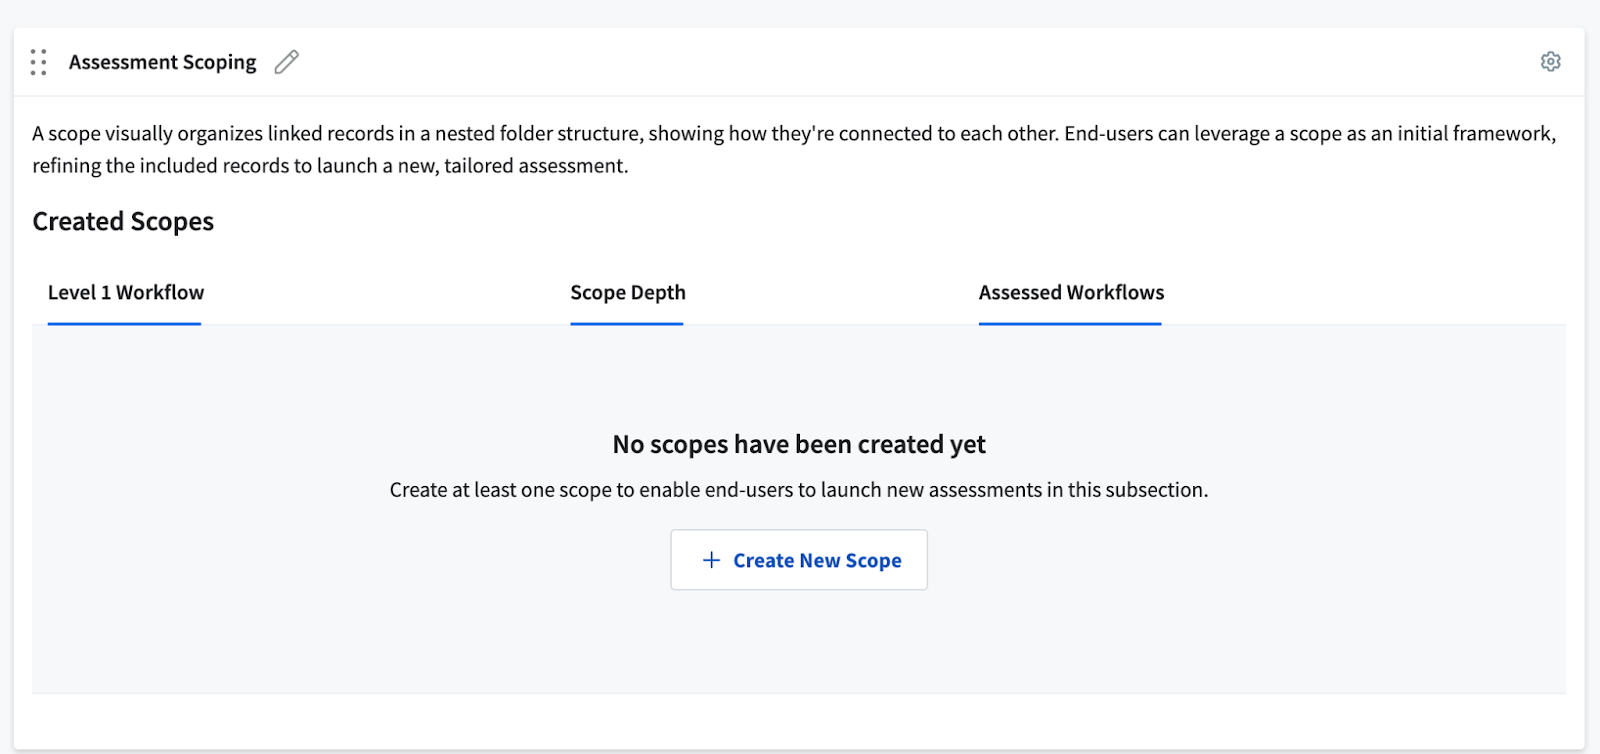
- In the step builder, click the “More Subsections” dropdown, where the “Configure Assessment Scoping” option should populate.
If no scopes have been configured yet, builders will see an Empty State with a “Create New Scope” button to get started.
**Please note that multiple subsections can be added across different steps in a workflow, but only one scoping section is allowed per step. Likewise, each workflow can only be added to the tree once.
Creating and Configuring Scoping Trees
Clicking the "Create New Scope" button opens a modal where builders can begin constructing their scoping tree.
Selecting Scoping Workflows
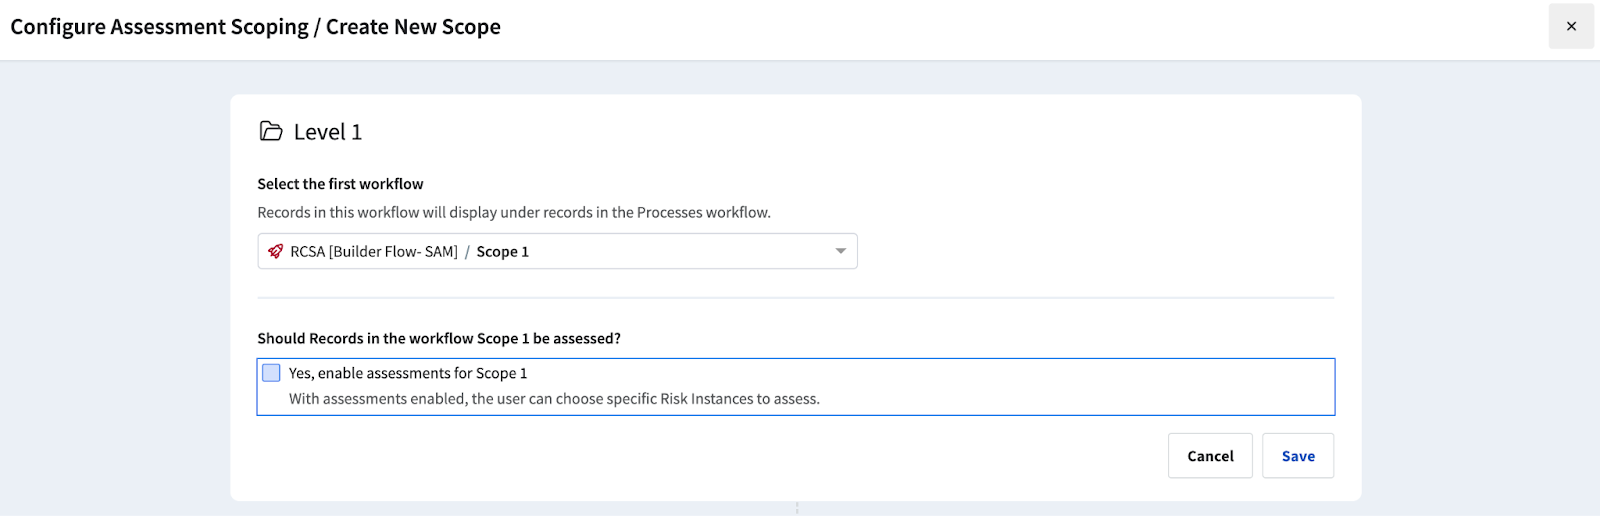
1. The first step in creating a scoping tree is by selecting the Level 1 Workflow, which specifies the source of data for the Scope.
- The Level 1 Workflow determines:
- What entity your end users will scope their assessments for (e.g., Business Units or Organization Workflow).
- Which additional workflows can be selected as child workflows, based on their mappings to the Level 1 Workflow.
- The scoping tree will display the Primary Field of each record from the selected workflows.
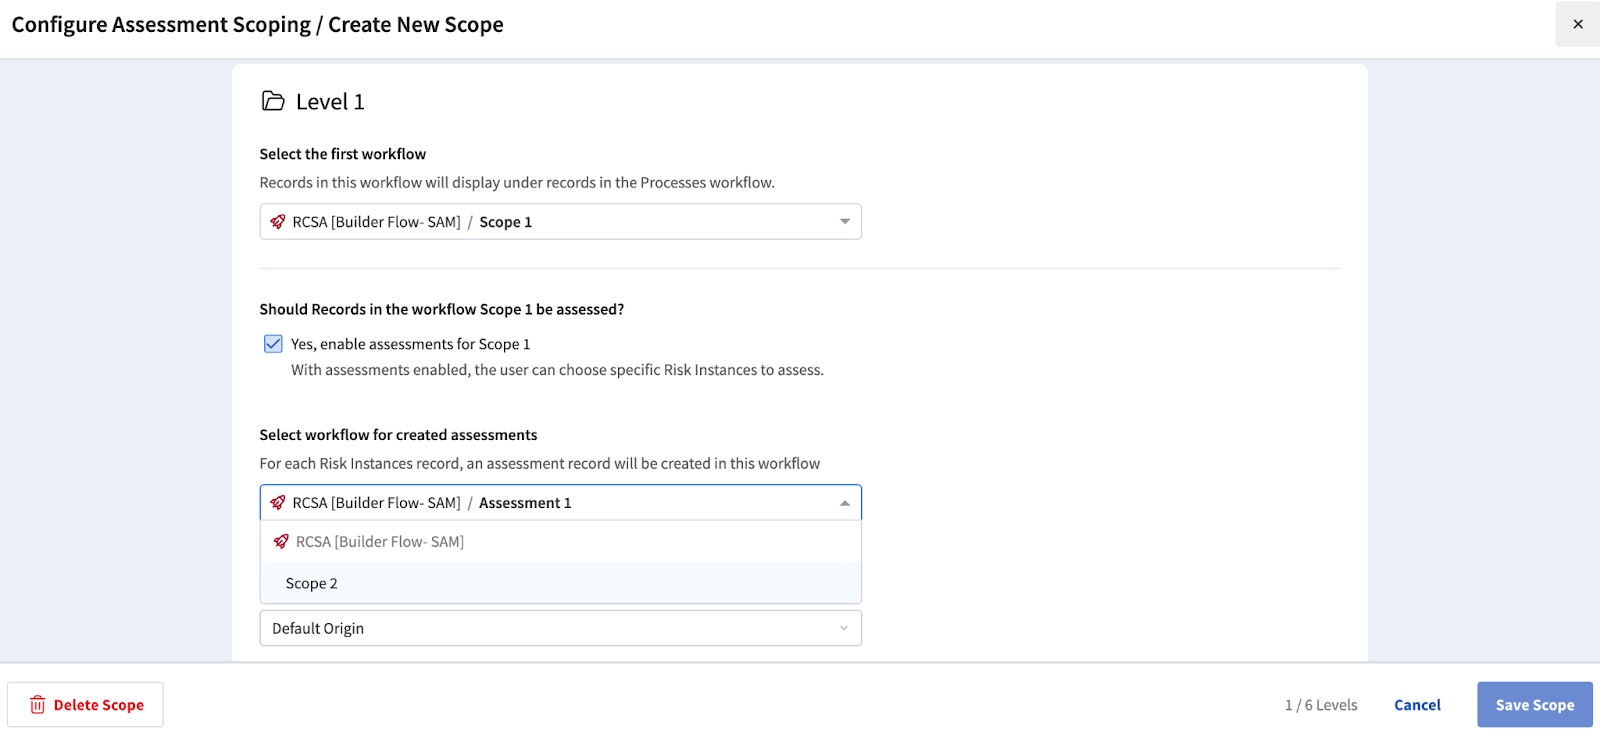
2. After selecting the Level 1 Workflow and clicking the “Save” button, the workflows available for Level 2 will appear in a dropdown. You cannot create a Scope with only one workflow level, nor can you select an Assessment workflow for the Level 1 Workflow.
- In order to be a selectable Level 2 Workflow, the Level 1 Workflow must have a one-to-many or many-to-many relationship with it. This relationship requirement cascades to all subsequent levels added.
- If your workflows have many-to-many relationships, records may appear multiple times in the tree.
- A maximum of 6 Workflow Levels can be added, and the scoping workflows are displayed in the tree itself, forming the hierarchical structure.
Selecting Assessment Workflows
Assessment workflows must also be configured in the Scope. Please note that these workflows do not make up the tree, but instead are where the Assessment Records will be created.
Rules for Adding Assessment Workflows:
-
Assessment workflows must have a many-to-one or many-to-many relationship with the corresponding scoping workflow.
-
The first assessment workflow must be linked to the workflow that the Scoping Section is being built in. For example, if the scoping section is in the RCSA Audits Workflow, the topmost assessment workflow (e.g., Risk Assessments) must be linked with a many-to relationship.
-
Subsequent assessment workflows (e.g., Control Assessments) do not have to be directly linked to the workflow that the Scoping Section is being built in, but they must link to the most recent parent assessment workflow in a many-to relationship. For example, if in the same scenario above we’d like to add the Controls Assessment workflow, it must be linked to the preceding Risk Assessments workflow.
-
At most, 2 assessment workflows can be added to the Scope, but at least 1 assessment workflow is required to be added.
Builders can create multiple scopes within a single subsection. If there are multiple, end users can choose the appropriate entity to assess. A Scope must be completely created and configured for it to appear and be usable to End Users.
Displaying Assessment Information
For each assessable workflow, the default layout will be selected to be used on the Confirm Scope modal for your end user. You may also select a custom layout to be displayed. For example, if you enable assessments for a Risks workflow, you can select a custom layout for Risks to display once the end user has selected which Risk records they would like to create assessments for.
For each assessment workflow, the default layout will be selected to be used to display all the newly created assessments displayed in the Assessment Scoping subsection on the Record page for your end user. You may also select a custom layout to be displayed.
Configuring Bulk Create and Link Settings
For each assessable workflow (meaning each workflow level with an Assessment workflow linked):
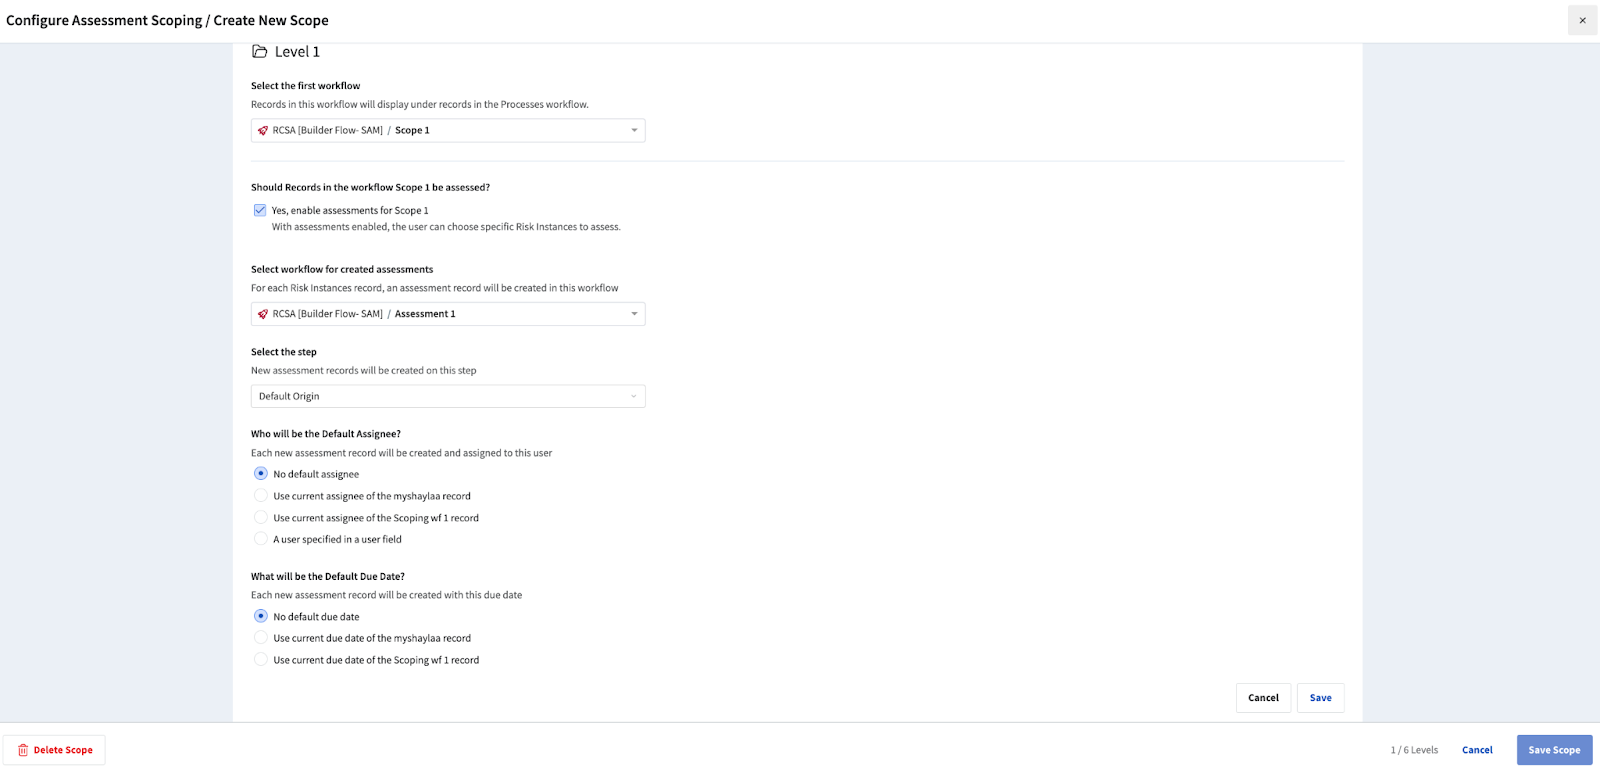
- Configure BCAL settings, including:
- Workflow for Created Assessments
- Default Assignee
- Default Due Date
Bulk Create Assessment Records
Once Assessment Scoping is enabled for the corresponding Workflow, end users will see a new Bulk Create Assessment Records option in the Scoping sub-section.
If Scoping Has Not Been Completed
- Users can click “Start Scoping” to kick off the assessment creation process.
- Note: Scoping can only be performed once per record.
If Scoping Has Been Completed
- The "Created Assessment Records" table will be visible in the Scoping sub-section.
- The “Start Scoping” button will no longer be available.
If a User Is Not Assigned to the Parent Record
- The “Start Scoping” button will not be visible.
- Users without Edit Access can still view existing assessments if they have already been created.
Scoping Process
Step 1: Define Assessment Scope
When the “Start Scoping” button is clicked, a fullscreen modal will appear:
Choose the object to scope from a dropdown list of scopes created by the Builder. Each scope is titled based on the top-level workflow of the scoping tree.
Select a specific Record within the object Workflow for which Assessments should be created.
- The record list will display names based on the Primary Field.
- You must have record-level access to select a record.
To continue the scoping process, click the “Apply” button. This button will remain disabled until a record is selected.
Step 2: View and/or Narrow Your Scope
After clicking “Apply”, your selections will switch to a read-only format.
The right-hand section will dynamically display the selected workflow tree structure.
- All Records in Workflows where Assessments are enabled will be selected by default. For example, in the Tree below, all Risks and Controls are selected:
You can expand the nodes of the tree and deselect specific Risk and Control records to narrow the assessment scope.
- If a parent record is deselected, all of its child records will be deselected as well.
- For each selected Risk and Control record, a corresponding Assessment Record will be created.
Note: If the tree is using many-to-many relationships, records may appear multiple times in the tree. If duplicate records are selected for Assessment Records, then multiple Assessment Records will be created.
Step 3: Review and Confirm Scope
Click “Review Selections” to proceed to the Confirm Scope page.
- For each assessment workflow selected (up to two), a table will appear outlining which corresponding assessment records will be created.
- Each workflow will display a separate layout table.
- Use the search bar to locate a specific record within each table.
- Tables will default to display 10 records per page, but this view can be adjusted by the end user.
- The footer will display the total number of assessment records that will be created.
- Click the “Create X Assessments” button to finalize.
If duplicate assessments will be created for the same Record, a message will appear informing of this. There is a Number of Assessments column in each layout table providing the number of assessments that will be created for each source child record. This column will appear even if custom layouts are used.
If you want to prevent duplicate assessments from being created, you can do so on the builder side by setting the Allow duplicate assessment creation toggle to Off. This toggle only appears when the current level of the tree has a many-to-many relationship with the previous level of the tree:
Post-Scoping Actions
After the assessment records are created:
- A toast notification will appear confirming completion:
- Bulk-created assessments are linked to the parent workflow.
- Once the "Created Assessments" table is populated with records, it will display them using Risk Cloud’s default layout: Record Name | Workflow | Current Step | Status | Assigned User
Users can use the search functionality within the Scoping Assessments sub-section tables to find a specific created assessment.
A summary section provides an overview of the total number of child and grandchild assessments created. If a significant number of records are being generated, this may take some time. As mentioned, users will be notified with a toast message once the process is complete.
FAQs and Troubleshooting
Q: Why can’t I edit a tree?
A: Builders must have build access to the Level 1 workflow of the tree to edit or delete it. Builders without access to Level 1 workflows can still view trees but cannot make changes.
Q: Why can’t I edit the upper levels of a tree?
A: Builders can only modify the lowest level of the tree. To edit higher levels, remove all dependent levels first and re-add them.
Q: What makes a tree invalid?
- Incorrect workflow relationships.
- Missing BCAL settings.
- Deleted workflows or configurations.
Q: Can multiple scoping sections be added to one step?
A: No, only one scoping section can be added per step. However, scoping sections can be added to multiple steps in the workflow.

